Clinical technique for making crowns
Planning stages before tooth prep
- study casts
- photographs
- trial preparations
- appearance
- final impression
- temporary crown
Study cast
- good impression with PVS and opposing cast articulated against eachother
Photograph - photo prior to prep
- also old photo of patient and how their teeth used to look
planning tooth prep - trial prep on study cast
- shows for sufficient length and thickness of different aspects for each type of tooth, and what materials may be indicated from these limitations
- can prep half the tooth to help visualise limtations etc.
Planning appearance
- diagnostic wax up
- shade
- best to do at start so not done hurriedly, as its most important
- needs to be correct in both artificial and daylight
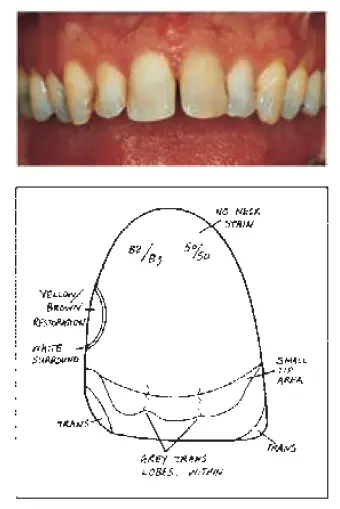
Impression
- standard, make special acrylic tray with some perforations and stops
temporisation
- typically bisacryl composite resin made from a putty key which is adjusted and cemented with a temp luting cement
Preparation
Posterior
- occlusal
- follow general shape with contours of cusps
- cusps that are "functional" (determiend by occluding surfaces and group function etc.) will be prepared more to facilitate greater thickness of material coverage
- the greater the axial length, the greater the retention, therefore over reduction of occlusal surface reduces retention
- reduction varies 1mm, 1.5mm depending on PFM or ceramic
- axial
- care for M and D where contacts are, leave thin wall to break off when prepping
- keep parallel as possible without undercuts, ideal taper of 10-20 degrees so dont start too angled
ANterior
- incisal and proximal
- keep the same inclination of tooth
- labial
- need adequate reduction to give good phonetics and avoid bulky labial surface
- gingivopalatal
- keep shoulder and wall nearly parallel to buccal gingival surface
- incisalpalatal
- best for large diameter instrument
- needs sufficient space, compare regularlyl
Anterior post crown
- remove GP from coronal part and prepare post hole, using whatever method manufacturer instructions advise
- post is cemented in place at an appropriate length to facilitate atleast minimum thickness of core buildup material around post to create the core
Impressions
- putty impression taken and relined to get an accurate impression first of what the original tooth was like
- in addition we must take impression of the actual preparation using 2 retraction cords and allowing plastic deformation of gingiva to create a really ideal impression
- occlusal record taken to articulate against
- lower impression taken to articulate against
Checking crowns
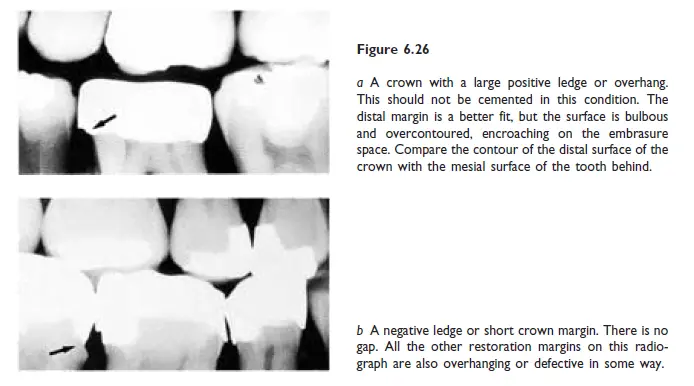
- me must inspect for marginal fit wit probe and eye
- looking for gaps, overhanging margins and deficiencies
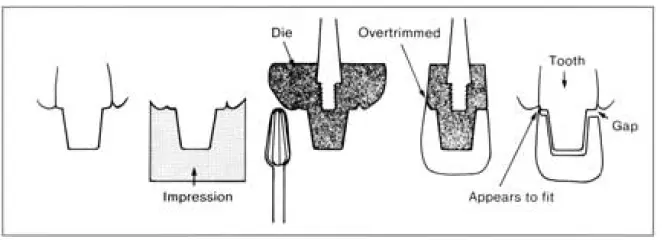
- uniform circumferential gap indicates incomplete seating of the crown
- first check for retained temp cement, trapped gingival tissue, firmer seating force, check contact points with floss
- inspect fit surface to inspect where crown is binding and ground lightly with a bur or stone
- retention
- shouldnt feel tight, shouldnt really rock or pivot, adjust as per necessary
- shade
- either stain it more and refire if its too bright
- if its too dark probably need to remake entirely
Cementation
choice of cements
- zinc phosphate
- long term usage, however there are cases of transient discomfort, or pulpal inflammation and necrosis,
- very long and controllable working time
- very thin cemment film (up to 10 um)
- resin based and adhesive
- 4-meta or phosphonate derivatives are inhibited in oxygen presence
- havent been used for as long as the other options
- usually for porcelain veneers or minimum prep bridges
-
GI cement